


Before heading out into the backcountry, most people check the avalanche bulletin and look at the number. Danger 2. Danger 3. And then they close it.
That number matters. But the bulletin has four more elements that are just as important, and together they give you a much more complete picture of what you'll find out in the terrain.
Here we go through them one by one.
The danger level: the starting point
The avalanche danger scale in South America runs from 1 (Low) to 5 (Extreme). It's designed to quickly communicate the likelihood of an avalanche, its probable size, and how it's distributed across the terrain.
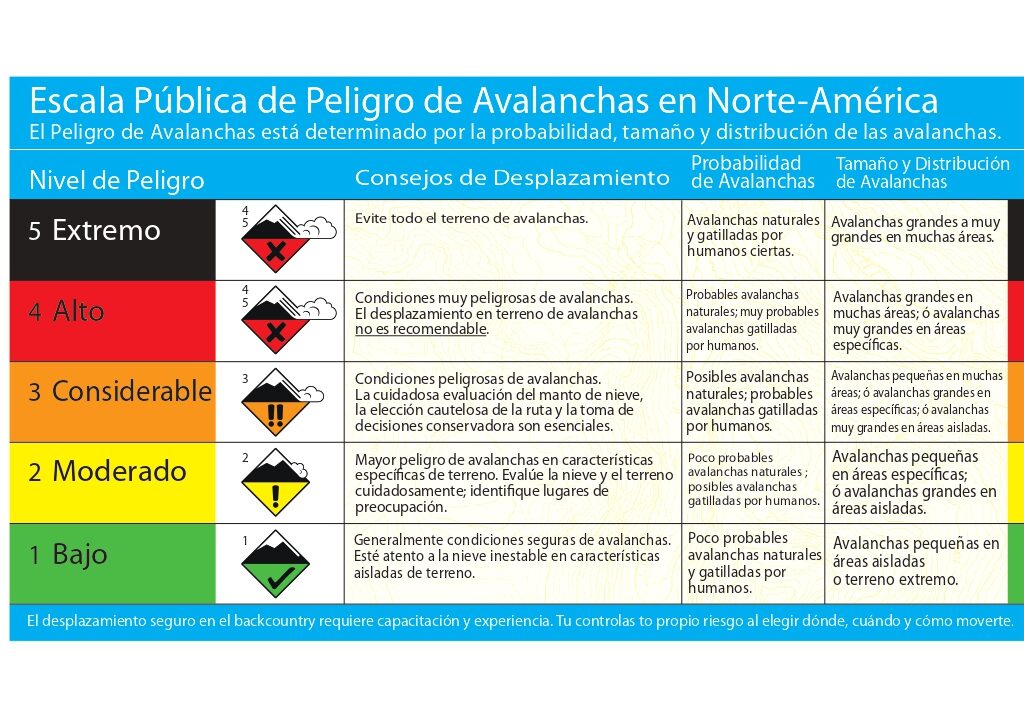
What each level means in practical terms:
1 — Low: Snowpack is generally stable. Safe conditions for traveling with good judgment. Still, pay attention to specific terrain features.
2 — Moderate: Some unstable slabs in specific terrain. The danger is localized, and the key is identifying where. Most backcountry days in a normal season are level 2.
3 — Considerable: Unstable slabs are likely on terrain with identified characteristics. This is the level where the most accidents happen, not because it's the most dangerous, but because many people go out anyway and underestimate how specific the affected terrain is.
4 — High: Very dangerous conditions. Likely avalanches are large and widespread. This is not terrain to improvise in.
5 — Extreme: Avoid all avalanche terrain. Period.
But the level alone isn't enough. Forecasters arrive at that number from several different paths: it combines the problem, its size, and its likelihood. What interests us most is what harm that problem can do to us tomorrow out in the terrain. To understand that, you need the four elements that follow.
Avalanche problems: what type of instability is active
The bulletin identifies up to three avalanche problems in order of concern. This is the most important thing you can read in the bulletin, because it completely defines the day's strategy.
The CIAv system, the forecasting service that works very well in the Bariloche and Chaltén areas, available at avalanchas.com.ar, follows the international classification and identifies nine types of problems. The most common in Patagonia and the central Andes during winter are:
Wind slab: Snow that wind has packed and deposited on the lee side of crests, ridges, and changes in slope. You can recognize it because the surface looks different: duller, sometimes with an irregular texture. It's localized, but it can show up where you don't expect it if you don't read the terrain well.
Storm slab: One or more layers of recent snowfall consolidated over a weaker surface. It's more widespread than wind slab because it doesn't depend on wind to form, so it covers most slopes where avalanches can occur. It stabilizes within days to a week after the storm, depending on temperatures.
Persistent slab: The hardest problem to manage. A weak layer buried in the snowpack that can stay active for weeks or months. Unlike wind slab, there are generally no obvious signs on the surface. It takes patience and a willingness to avoid suspect slopes for a long time, even when the terrain looks perfect.
Deep persistent slab: Similar to the previous one, but with the weak layer at the base of the snowpack. Hard to trigger, but when it releases it produces very large avalanches. It's the low-probability / extreme-consequence scenario.
Cornices: Masses of wind-formed snow that overhang ridges and crests. They can break off even on flat terrain behind the crest. A small cornice can have enough mass to be destructive on its own, or to trigger a slab below.
A level 3 day due to wind slab is completely different from a level 3 day due to persistent slab. The number is the same. The terrain decisions are different.
The danger rose: where the problem is
The danger rose is the circular diagram you'll find in every bulletin. It combines two things:
- Aspect: which direction the slope faces (north, northeast, east, etc.)
- Elevation band: alpine (above treeline), near treeline (the transition band), or below treeline
How the bands are defined depends on each forecasting center and the geographic characteristics of the bulletin's region.
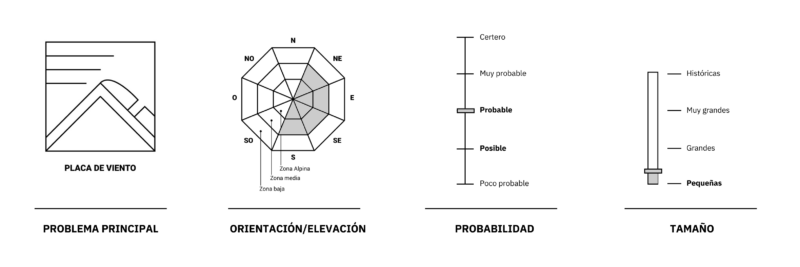
How to use it in practice: if the rose shows that the wind slab problem is on east, north, and northeast aspects in the alpine, that tells you the slopes with those aspects and that elevation need the most attention. South and southwest aspects at lower elevations are your safest terrain for the day. But we're also looking for the best snow quality, so it's always a balance between safety and quality.
The rose turns the bulletin into a concrete route-planning tool. It's not a decorative graphic.
Likelihood and size: how much and how likely
Likelihood of triggering: How easy is it to trigger the slab? It can range from “unlikely” to “very likely.” When it says “likely,” a single person on skis can be enough to trigger a slab on loaded terrain. When it says “possible with remote triggering,” it means you could trigger a slab while standing on terrain that looks safe, because the fracture propagates through the snowpack. This is very common with persistent problems prone to propagation.
Expected size: Avalanches are classified from D1 (can't bury a person) to D5 (catastrophic). A level 3 problem with large slabs in the alpine is not the same as a level 3 with small avalanches below treeline.
Combine likelihood with size to understand the real consequences: a low likelihood with D4 size is still a dangerous scenario.
Trend and validity period: when this bulletin applies
Bulletins have a validity period and a trend. If the forecast says the danger will increase in the afternoon due to warming or rain, that defines your time window.
Starting early when the bulletin says “danger increasing in the afternoon” isn't obsessive, it's planning. Snow that's firm at 9 a.m. can be saturated with water by 2:00 p.m. and produce wet slab or wet loose avalanches on slopes you'd already skied.
Bulletin + terrain + observations: the three together
The bulletin is regional. It describes the danger for a broad area, not the specific slope where you're going to ski. That's why you always supplement it with what you observe in the field:
- Has there been recent avalanche activity in the area?
- Does the snowpack sound hollow when you step on it? (A sign of a weak layer)
- Are there cracks propagating under your feet or skis?
- Do the snow conditions match what the bulletin described?
If the bulletin identifies a wind slab problem on east/north aspects and in the field you don't find wind-transported snow or dull surfaces on those aspects, you can adjust your read. If you find more signs than you expected, trust what you see. But always within a margin. Don't get too motivated, because this is where our own mind comes into play.
→ Decision-making in avalanche terrain: common mistakes
And always, always, take terrain traps into account: gullies, cliffs, creek beds, places where even a small avalanche can have disproportionate consequences.
Where to find the bulletin in Argentina
The avalanche forecasting system in Argentina is still developing, and there's a long way to go. Depending on the area:
- Bariloche and Chaltén: avalanchas.com.ar — the CIAv service, the benchmark in Argentina, with bulletins for Bariloche and Chaltén. Coming soon to San Martín de los Andes.
- Central zone (Mendoza, Ruta 7 Corridor, Las Leñas): There are no regular reports. Some local groups publish, such as @aconcaguaavalanchas on Instagram and Fundación Riscos Andinos in the Pehuenche area.
- Ushuaia: Club Andino Ushuaia and certified local guides such as Patagon Mountain Agency publish special events. There's also @avalanchasushuaia on Instagram.
It's worth noting that, except for the CIAv, none of the others have the infrastructure of snow-weather study plots, permanent stations, observers and forecasters with recurring, defined duties, and a consistent model with a track record. So their accuracy may not be the best. Producing a bulletin is expensive and requires support from public and/or private entities.
The CIAv bulletin at avalanchas.com.ar is the starting point for any outing in the Bariloche region. Always supplement it with recent field information from guides and groups who have been out before you.
In summary
The avalanche bulletin has five elements that work together:
- The danger level — the scale from 1 to 5
- The avalanche problem — what type of instability is active
- The danger rose — which aspects and elevations the problem is on
- Likelihood and size — how much and how likely
- The time trend — when it's best to go out
Reading all five takes ten minutes. And it changes how you plan your route, the timing of your outing, and the decisions you make in the terrain.
At Backcountry Cooperative we teach N1 and N2 avalanche risk management courses with field days in Patagonia. If you want to learn to read the terrain and the snowpack in depth, check out the upcoming courses →